Tuesday, 9 June 2015

June Pastimes

After sewing and crochet, my third favourite pastime is getting out in the countryside with our little jack russell Lulu. Every time we venture out I am reminded how lucky I am to live in this beautiful part of the country.


I live on the Wirral peninsular which is on the north west coast of England sandwiched between Wales and Liverpool. If we look east we can see the amazing Liverpool skyline


This picture was taken the weekend the three 'Queens' came to Liverpool. This huge cruise liner makes the Liver building look tiny!

If we look west across the Dee Estuary we can see North Wales and on a clear day Snowdon.


Having a dog makes you go out whatever the weather and we love to look for little hidden gems in our local countryside.

We have picturesque sandstone villages,


shady woodland pathways,


peaceful patchworks of farm land


and of course beautiful sea views.


My creative projects are often inspired by my surroundings. For my latest crochet piece I have decided to use these soft heathery shades and work them into a hexagon design blanket


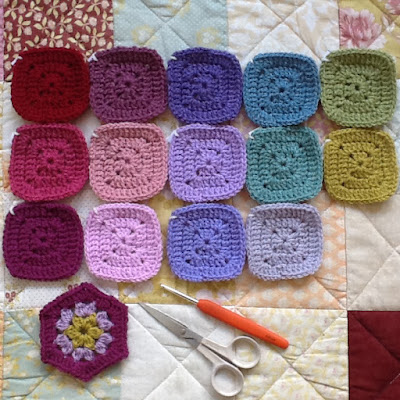
When planning colour schemes for my crochet projects I play around with my colour swatch squares. I made these after being given the idea from my friend Heather from The Patchwork Heart. I have hours of fun just choosing and rearranging different colour combinations.

Every time I buy yarn (I always use Stylecraft Special DK) I make a colour swatch square before I do anything else and tie its name tag to the corner so I know what shade it is. I've accumulated quite a few squares so far!


Anyway, back to my colour choice. It didn't take me long at all...I'm usually such a ditherer, but this time they seemed to be all my very favourite colours. My cosy living room is painted pale meadow green and the room has ascents of dark red (which is my all time favourite colour) on my patchwork cushions. I also love the blend of the misty, soft pinky purples in contrast to the zingy lime.

When I went to photograph the swatches on my favourite old quilt that I keep folded over the arm of my sofa, I realised that many of the tones in the quilt are the same as my swatches. This was when I knew I had made the right choice!


I've made several blankets based on squares and circles but I've never tried hexagons before. After seeing what some of my online 'crafty friends' have done and doing some research I decided to go with this simple little hexie I found on Revelry


First I made a batch of circles in all the different colours for the first round. They look proper messy but hang on they will soon start to take shape in the next round!


For round two I made sets of each colour with different centres to try to mix up the colours evenly. I keep my colour swatches handy to remind me to use all the colours equally. I have used this basket to store them in, this way they are quite portable for crocheting in the garden on a nice day or on a long car journey (as a passenger I fall asleep unless I have something to do!).


This is the stage I am at now. I'm making the little two ring circles into hexagons joining as I go. This is the best bit as the colours really start to jumble along together!


I never tire of looking at different areas where different colours meet.


I'm not sure how big this blanket will end up being, I'm just going to keep going until I feel like stopping! This is such a therapeutic pastime... I can just go with the flow!!!!!!

I'll let you know when its finished but this beauty is definitely for me!

Judith xxx

Friday, 15 May 2015

Messenger Bag Tutorial

I love to make this bag as it is so versatile. it is roomy enough to be nice and practical to use and its size also means that it is not too fiddly to sew. Its simple square shape and large flap give lots of scope for your own decorative designs.


In fact this bag design proved a real hit with my Year 9 students who are 13 or 14 years old. I think their end results are fantastic!


To make my messenger bag you can download a PDF of the pattern here


(Remember to set the print size to 100% when you print it out)


To make this bag you will need:

Fabric for the outside of the bag - this could be one piece, or a patchwork of different fabrics, or up-cycled from an old pair of jeans
Lining fabric
Wadding
A small pice of fusible interfacing for the inside of the flap
Webbing for the strap or you could make this out of the same fabric as the bag
Magnetic fastening or velcro

Instructions for making the messenger bag:

For this bag I used 2¼ inch wide strips of these soft grey and pink coordinating craft cottons.


First cut out and decorate the flap. I've added appliquéd hearts. back with wadding and quilt in which ever way you like. I've quilted 'in the ditch' between the strips on this bag.


At this stage you may as well add the wadding to the bag body pieces. I do this as it helps to give a bit of 'body' to the shape of the bag. you could use high loft fusible fleece but this is quite expensive and I find ordinary polyester wadding gives quite a nice soft feel to the bag. For this bag made from up-cycled jeans, I've just stitched the wadding around the edges of each piece, but if I'm using thinner cotton I will often quilt all over the surface with stipple quilting for a firmer finish.


Cut the flap back in plain fabric and add iron-on interfacing to the back (no wadding for this piece). A tip - I usually trace the stitching line on to the interfacing to make it easier to stitch perfect curves when sewing the flap pieces together. As you can see I've left little tabs of interfacing in the seam allowance so it doesn't pull off when you start turning the flap through to the right side.


Next attach the magnetic clasp, one side to the flap piece and one to the front body piece. Line them up carefully using the markings from the paper pattern.


Sew the two flap pieces together by placing them right sides together and stitching around three sides, leaving the top edge open. Snip the seam allowances around the curves and turn through to the right side. Press lightly and topstitch close to the edge to give a flat finish.


Stitch the completed flap to the back bag piece, right sides together. Make sure the flap is positioned in the centre and points down into the bag.


Now sew the bag together by placing the front and back pieces right sides together. Stitch the sides and the base but leave the corner sections and the top open.


Fold out the corners, matching the side seams and the bottom seam and stitch this short seam straight across.


The bag body is now complete.


Now to the lining. Stitch the side and base seams, only leave a gap about the width of your hand span in the base seam. You will turn the whole bag through this hole after you have stitched the lining to the bag.


Stitch the corners by matching the seams together, as for the bag body.


Work out how long you want your strap and stitch the ends to the top edge of the right side of the bag at the side seams. The strap should hang down into the bag. Make sure the strap is not twisted.


Turn the bag right side out and tuck it into the lining so that the right sides of both bag and lining are facing each other. Make sure that the strap and flap are completely hidden, sandwiched between the two layers. Match the sides seams together and stitch all the way round the opening of the bag.


Turn the whole bag through the hole you left in the base of the lining.

Stitch up the gap by folding in the seam allowances and machining close to the fold through all the layers. This stitching will be hidden inside the bottom of the bag.


Tuck the lining inside the bag and topstitch around the top of the bag to help keep the lining inside and give a more professional finish.


You've now finished your messenger bag.


I hope you have found these instructions straight forward enough to follow. Please add a comment if you have any questions or just like my tutorial. Do let me know when you have made your own messenger bag. I would love to see your interpretation.

Happy sewing


Judith xxx

Monday, 27 April 2015

New Beginnings


This week I am really excited to announce the opening of my Etsy shop. 


I am planning to sell a range of pretty patchwork bags and gifts for your home. All the items are lovingly made by me and are all different, so you are sure to have a truly unique purchase. 

You can choose from my patchwork handbags, cosmetic purse ranges, quilts and throws or kitchen mats and cosies. 

I love to work with pretty, coordinating, high quality cottons and often team them up with up-cycled denim from old (clean!) jeans to make my trademark handbags. 


I can't resist bright colours and pretty patterns and spend hours dreaming about and planning new combinations and designs for my range of cosmetic bags and purses. These are always popular for gifts for the girls, from grandmas to teenagers!


I love making patchwork quilts but have too many at home already to make anymore to keep (says my husband!). These can take hours to make, definitely a labour of love but once finished will last for years if you care for them.


In the evenings I like to relax with my family but I have never been able to sit in front of the TV doing nothing. I have to have a crochet project to work on, it enables me to be creative whilst still resting! I can't claim to be an expert but am really inspired by my good friend Heather from The Patchwork Heart. 
Heather's tutorials and those by Lucy at Attic 24 have helped me to develop this skill.


I hope you like this little preview of my exciting new venture.
I will be adding to my shop regularly to please stop by and take a look.

X X X

Wednesday, 8 April 2015

Easter Activity

Spring is definitely in the air, the days are longer, there is the sweet smell of crocuses and daffodils on the breeze and we've had the first few warm sunny days here on the Wirral. The Easter weekend saw the house packed with the family, giving me the opportunity to indulge in a spot of baking, a pastime I love but don't do as often, now the children have all grown up and our waistlines need no further expansion! My chocolate Guinness cake is a firm family favourite and my chicken and ham pie went down a treat.

The brighter weather has inspired me to bring some colour into my creative projects. I've chosen these pretty chalky colours for the 'v' stitch blanket I'm working on in the evenings. Every new row brings a smile to my face as this bright little blanket emerges. Perfect for a little girl I think!


I'm definitely an all or nothing person. I can be fired up and full of creativity, my hands struggling to keep up with all the ideas whizzing round my brain. Then after a while I run out of steam and can't seem to get the motivation to make anything. I find these periods very frustrating especially when they coincide with holidays and I have time to spare. Eventually inspiration comes, often after browsing on Pinterest or talking with likeminded friends. The cogs start to turn again and I'm off!

I've had these striking retro print fat quarters in my stash for a while and decided to make them into a messenger bag swapping my usual heart appliqué for a 70s cosmic design! This bag shape is another favourite of mine as its so versatile. Its practical to use and the design has lots of scope for your own interpretation. I'm currently working on a tutorial so watch this space!


A couple of people who I sit with for lunch at work asked me for a lunch bag with a drawstring lining. I found this great tutorial for just the thing at Pink Penguin So far I've tried it out in these bright polka dots (anyone who knows me, knows about me and polka dots!!).


Today I found these fabrics in my local fabric shop while stocking up on bits and bobs. The green / blue combo and the Cath Kidston inspired heavier weight cotton will be great for these little lunch bags.


A while ago I was asked by a friend if I made tea cosies. I finally got round to trying one out. I found this lovely fabric with tea pots on it and thought it most appropriate!


The last thing to show from my latest making frenzy is this pretty set. The cube bag is a regular repeat but I haven't done a matching drawstring bag for a while.


Well This Easter break has been busy so far, I will hopefully be in touch soon with a new tutorial and some more of my makes.

xxx